Capturing the ISS on a Budget: Q&A on Thrift Store Lens Photography
Photographing the International Space Station (ISS) from Earth is a rewarding challenge that pushes the limits of budget equipment. Recently, YouTuber [saveitforparts] attempted this feat using a $15 thrift store lens, proving that old film gear can still perform in the digital age. Below, we explore the key questions about this project and the techniques involved.
Why is photographing the ISS so difficult even with a long lens?
The ISS orbits Earth at roughly 28,000 km/h, zipping across the sky in minutes. To capture it, you need precise timing, a stable tripod, and a lens with significant focal length—usually 400mm or more. The station appears small and fast, so even slight misalignment or camera shake ruins the shot. A thrift store lens, while cheap, often lacks autofocus and image stabilization, compounding the challenge. With a $15 400mm Sigma XQ lens and 2x teleconverter, [saveitforparts] managed to record the ISS as a white dot, but not enough to reveal its solar panels or modules. The combination of atmospheric turbulence, limited zoom, and manual focusing made detail elusive. Essentially, the ISS is a moving target requiring both luck and skill.
What gear did [saveitforparts] use for this project?
The core setup was a 400mm Sigma XQ lens originally designed for film cameras, paired with a 2x teleconverter—all found for $14.99 at a thrift store. An adapter allowed mounting on a Sony NEX-3 digital camera, which provided a mirrorless platform with good low-light performance. The lens itself is so large it includes its own tripod mount, emphasizing the vintage build quality. Additionally, [saveitforparts] attempted a Canon camcorder for video capture, though results were similarly limited. The entire rig cost under $50, showcasing how old film equipment can be repurposed for modern astrophotography without breaking the bank.
How did they locate and track the ISS?
Instead of random pointing, [saveitforparts] used N2YO.com, a satellite tracking website that provides real-time pass predictions. This service gave precise times and sky positions for the ISS over his location. The photographer then set up the tripod and manually aimed the lens at the predicted path. Because the ISS moves quickly, he had to pre-focus at infinity and use a remote shutter or video mode to catch the flyby. No motorized tracking was used—just careful planning and manual panning, which often results in the ISS appearing as a streak rather than a sharp object.
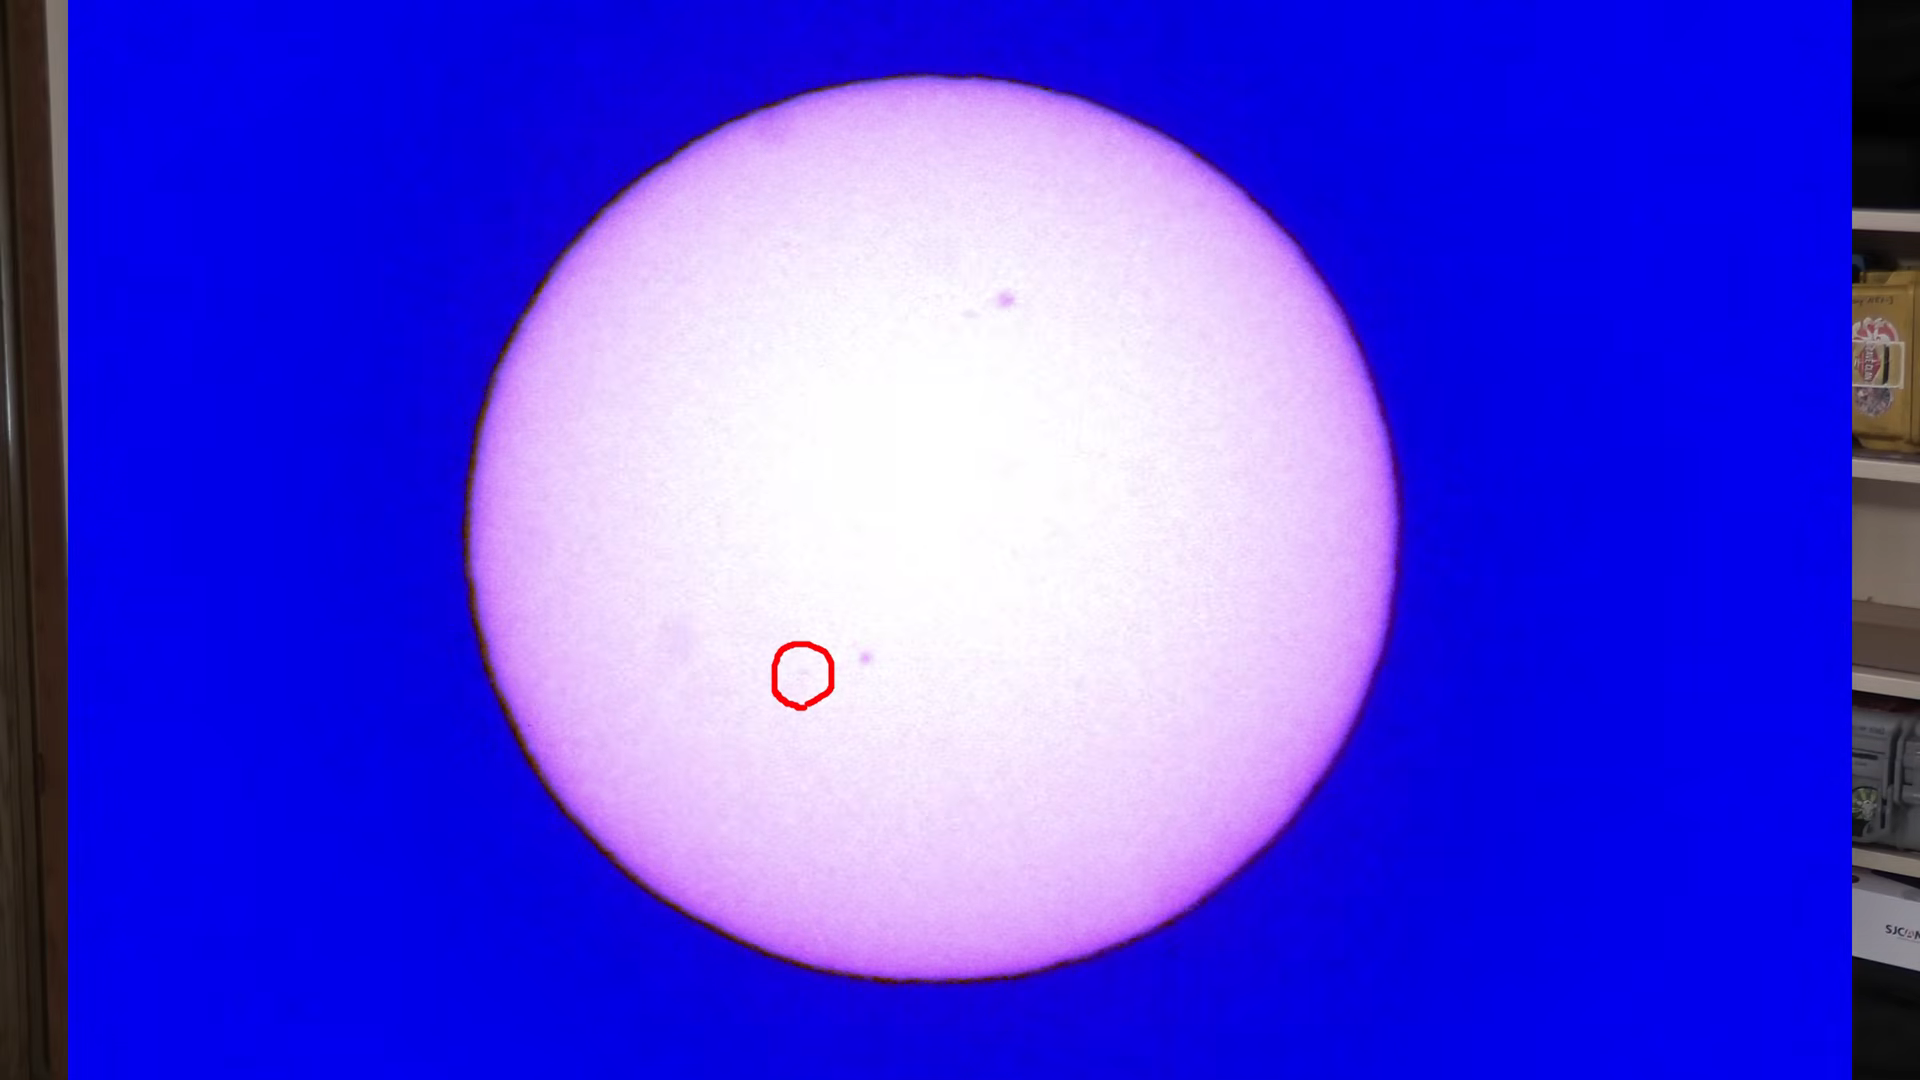
What were the actual results of the attempt?
The initial capture showed the ISS as a small white dot crossing the frame—technically photographed, but lacking detail. The 400mm lens with 2x teleconverter gives an effective 800mm on the Sony NEX-3's APS-C sensor, but that wasn't enough to resolve the station's shape. Later attempts included filming a solar transit (ISS passing in front of the Sun), but the station appeared only as a tiny speck against the brilliant disk. Overall, the results proved the concept: even ultra-cheap gear can detect the ISS, but for a recognizable image, higher focal lengths (1000mm+) and possibly auto-tracking mounts are needed. [saveitforparts] noted that the Canon camcorder footage was “blobby” and indistinct.

Are there other creative ways to capture the ISS?
Yes! The hobby community has tried everything from Game Boy cameras to disposable Kodak Charmers. Each attempt adds a twist: extreme low-resolution sensors, plastic lenses, or pinhole cameras. These projects emphasize the challenge and fun of astrophotography without expensive telephoto lenses. For example, a Game Boy Camera yields blocky pixels while a Kodak Charmera relies on fixed-focus and film. The key is to have realistic expectations—capturing the ISS as a point of light is achievable; capturing it as an identifiable structure requires far more serious gear. [saveitforparts] jokingly invites such creative attempts to be shared on the tipsline.
What tips would you give someone trying this at home?
- Use a tracking website like N2YO.com to find bright passes—dawn and dusk are best.
- Choose a lens with at least 400mm focal length; a teleconverter helps but reduces light and sharpness.
- Mount your camera on a sturdy tripod and manually focus at infinity using live view zoom.
- Shoot in burst mode or video to maximize chances of catching the brief transit.
- Consider waiting for a solar or lunar transit—the ISS silhouette is easier to spot.
- Don't expect Hubble-level images; celebrate even a white dot as a technical achievement.
With patience and thrift store finds, you can join the ranks of amateur ISS photographers.
Related Articles
- Newly Uncovered Fast16 Malware: A Pre-Stuxnet US Cyber Sabotage Tool Targeting Iran
- Breaking Elliptic Curve Cryptography with Quantum Computers: A Practical Resource Reduction Guide
- How to Assess the Hidden Costs of Newt Metamorphosis Across Sexes
- How to Identify the Hidden Risk Factors in SpaceX's IPO: A Step-by-Step Analysis
- How to Get Ready for the Largest IPO in History: The SpaceX Case Study
- How Prada Is Revolutionizing Spacesuit Fashion for NASA's Artemis Astronauts
- Revolutionary Lithium-Plasma Engine: Your Ticket to a Smoother, Faster Mars Journey
- Portuguese Engineer Wins Top IEEE Young Professional Award for RF Sensor Breakthroughs